
In my previous blog post, during several of my Process Builder presentations, and all over the HUB, I have talked about how and why you shouldn’t just use Process Builder to automate your Campaign Member creation and deletion.
But Why Not Just Process Builder???
In case you are late to the party, here’s the skinny on using only Process Builder to create, edit, or delete Campaign Members:
- you can’t create something that already exists
- you can’t update something that doesn’t exist
- Process Builder can’t delete records – even it if could, you can’t delete something that doesn’t exist
Think about this for a second. Campaign Member records are unique in the Salesforce word in that a Contact can only have one Campaign Member record per Campaign. Process Builder is very literal. If you set up Process Builder to create a new record, but that Contact is already a member of that Campaign, Process Builder errors out. This happens more often than you think. Maybe the Contact was manually added by a staffer or met the criteria multiple times. Same thing with editing and deleting Campaign Member records, if the record doesn’t exist, you can’t modify it.
Okay, So How Do I Do It Then? Process Builder + Flow is the Way to Go
If you haven’t heard of Flow before, you’re about to get a crash course. First thing you should know about Flow is that if you have ever created a Process Builder, you have, unknowingly, created a Flow. Process Builder is just a more friendly interface for Flow. I am not going to lie and tell you that you just need play around with Flow for a bit to get the hang of it. There are those to whom Flow just makes sense, but we are in the minority. That is why Process Builder exists! Unfortunately, there are those times when you need to take Process Builder to the next level call a Flow.
Nooooooope! Where’s the Link to Download All This? I Was Promised a Link!
I have created a package that contains two, reusable Flows for Creating/Updating Campaign Members and Deleting Campaign Members. Feel free to download this so you don’t have to create the Flows yourself.
There are too many use cases for automating Campaign Membership, so I haven’t even tried to add a Process Builder to this package. Install the package and follow the instructions in the last step below to configure your Process Builder.
Alright, You Get the Gist. Let’s Build This!
Start by finding Flows – Open the Setup Menu – Type in Flows in the left sidebar search
Click on New Flow.
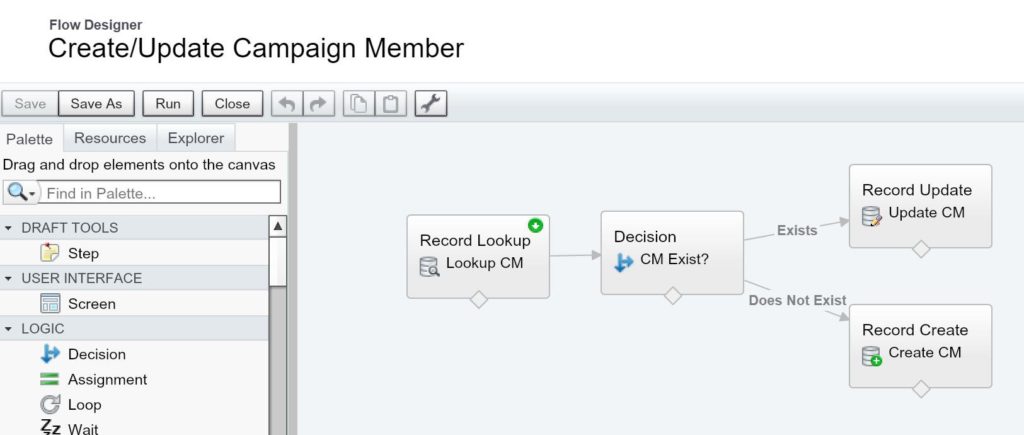
Drag and drop a Record Lookup step to the Canvas (main empty space) – This step is going to use the Contact’s ID and the ID of the Campaign to look up the Campaign Member ID. If a Campaign Member record exists for that Contact with that Campaign ID, it will populate the Campaign Member variable with its ID, otherwise, the variable is blank.
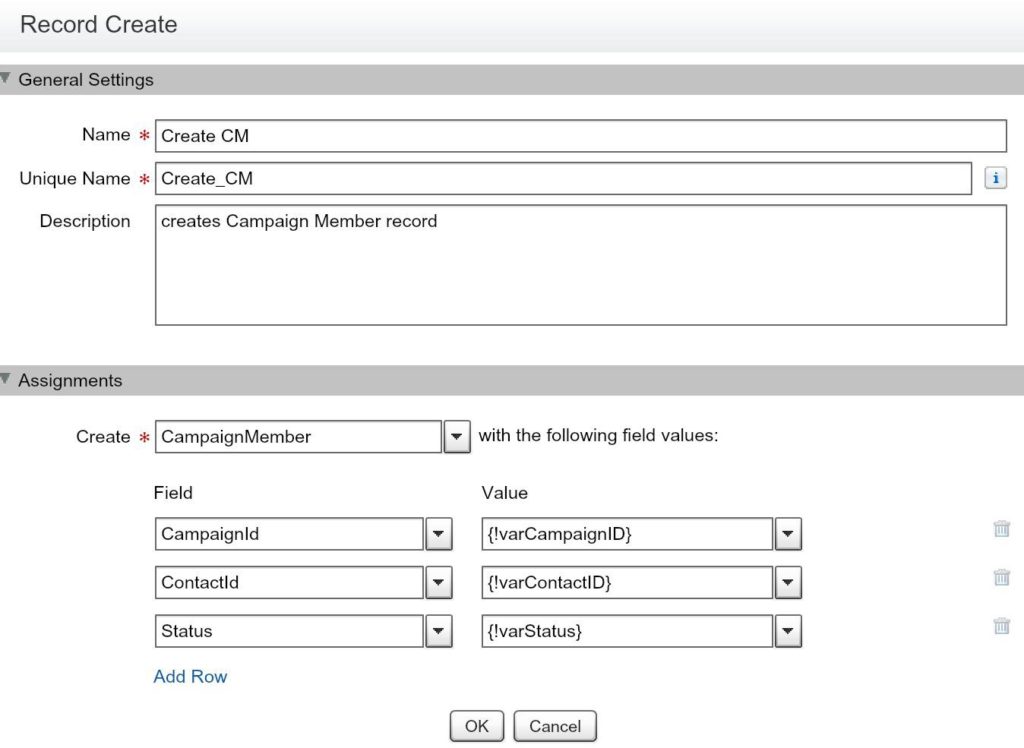
Give it a Name, and make the rest of the fields look like this:
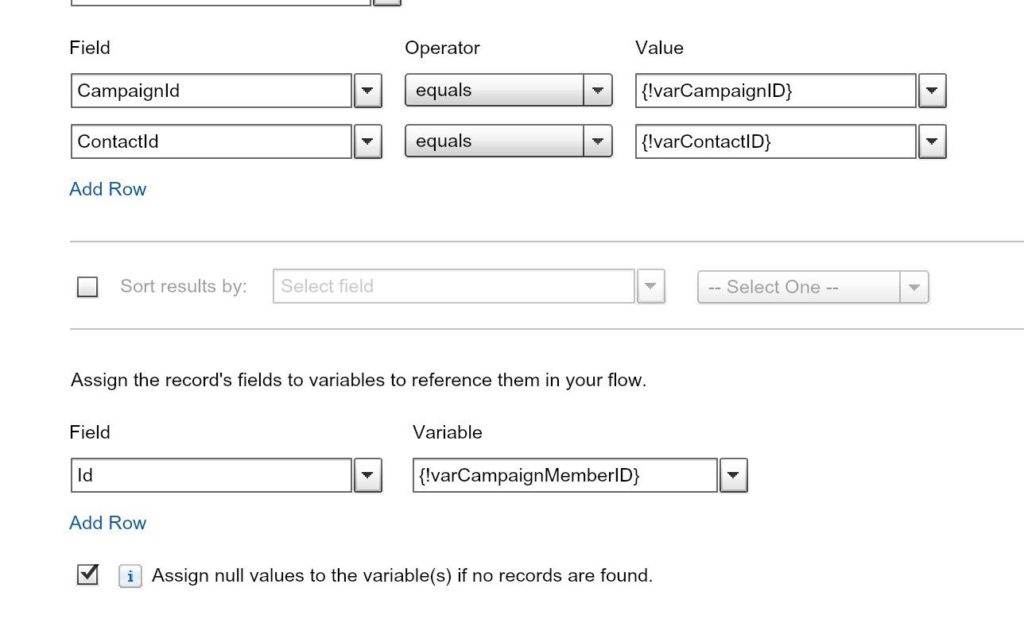
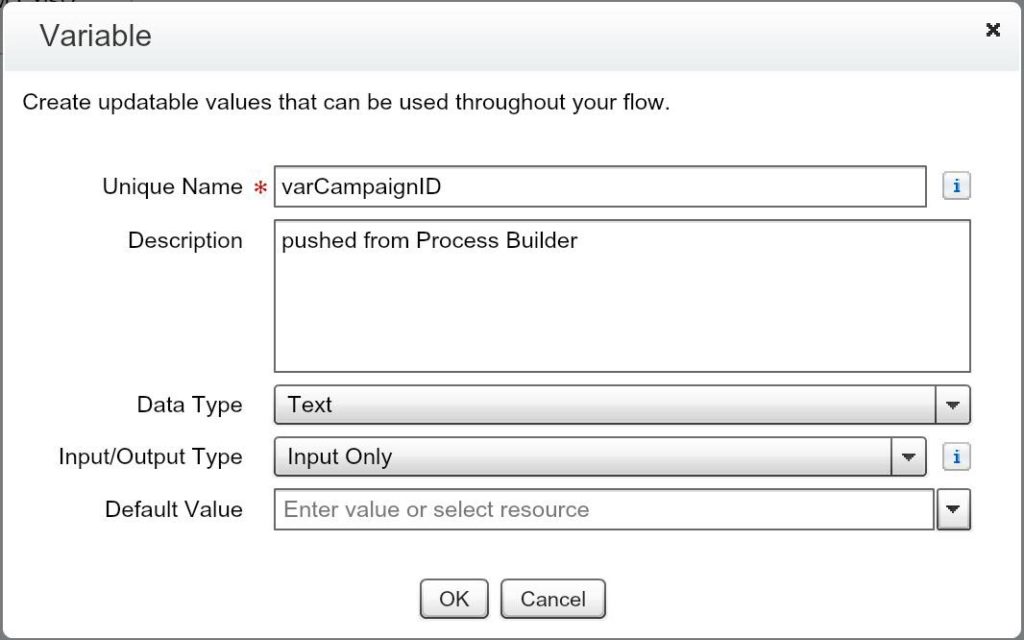
The {!FieldName} in the Value box is a variable – this is the data that we are going provide this Flow from our Process Builder. For each value field, you will need to create a new variable, you can do so by clicking on the Value field and choosing CREATE NEW and then Variable.
For the Campaign ID and Contact ID fields, make sure the Data Type is Text and the Input/Output Type is Input Only. Giving it an Input Type allows us to pass values to these fields. If we wanted to daisy chain Flows, we can use Output Type to pass values from this Flow to another. We won’t be doing that.
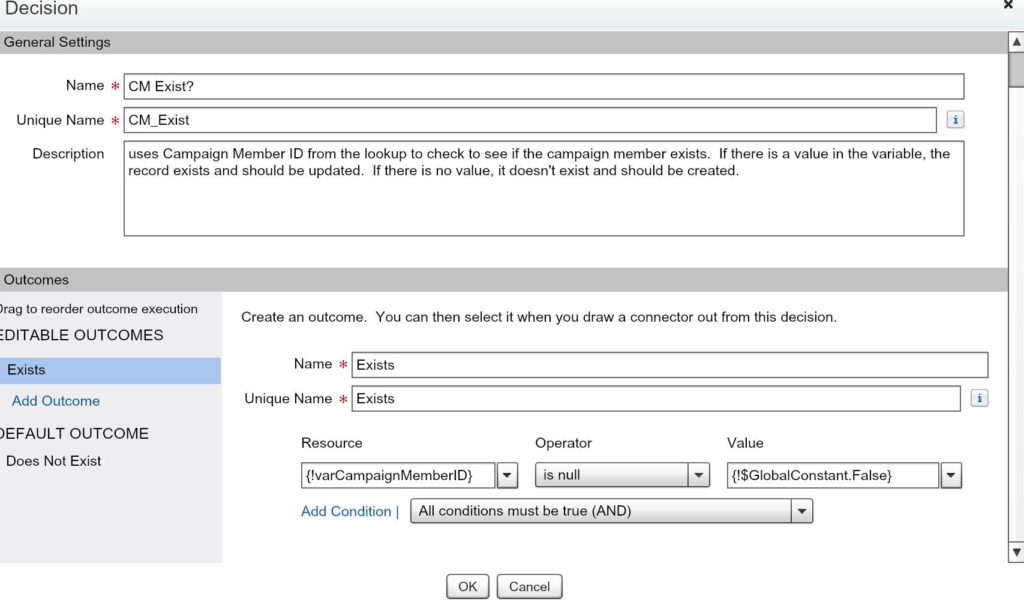
Drag and drop a Decision Step to the Canvas – We need to check to see if that Campaign Member Record ID variable has anything in it. If it does, we are going to say that it “Exists”.
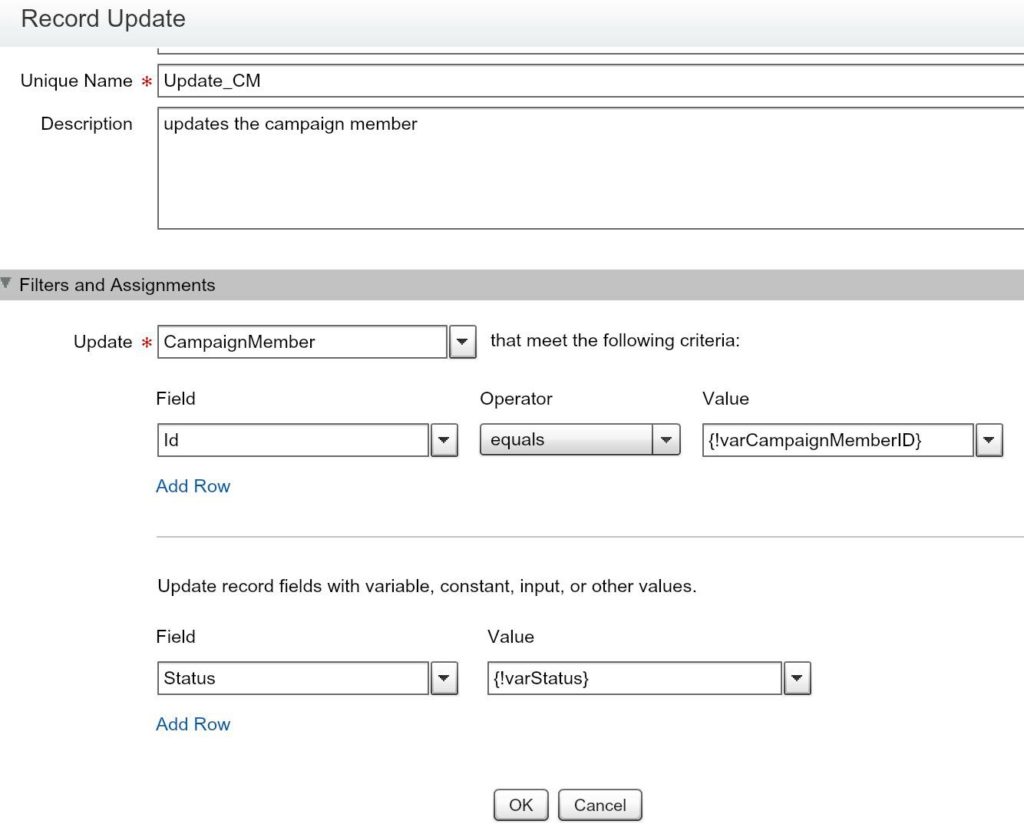
Drag and drop a Record Update step to the Canvas – here’s where we actually update the existing Campaign Member Record. This steps says, find the Campaign Member record with the ID that we populated from the Lookup step and determined was not blank in the Decision step.
Create a new variable for Status. Sure, you could hard-code this with a static value, but then you would have to create a Flow for every status that you ever need to update. By creating a variable that you define in the Process Builder that calls this Flow, you can reusing this Flow over and over and over again. Also make sure this is set to Input Only as we will be passing data from our Process Builder for this field as well.
If there are any other fields you need to populate, you can add those here – creating new variables as needed.
Drag and Drop a Record Create step to the Canvas – For those Contacts where the Lookup step didn’t find an ID, and the Decision step determined was a blank value in the Campaign Member ID variable, we will now create a Campaign Member record.
Again, make sure the Status is a variable so we can reuse this Flow . Add any additional fields you need on the Campaign Member record.
Finally, we need to finish off our Flow.
Hover over the upper right hand corner of the Record Lookup step, and click on the green circle with the white arrow. This marks the step as the starting point for the flow. We will now set the order of the steps and make it look more like a flowchart.
- Click on the diamond at the bottom of the Record Lookup step and drag to the Decision step
- Click on the diamond on the Decision step and drag to the Record Update step – choose Exists
- Click on the diamond on the Decision step and drag to the Record Create step – choose Does Not Exist (or [Default Outcome] if you didn’t customize on the Decision step – #5 above)
Lastly, save the Flow. Then close out and activate it. Don’t forget to activate it!!
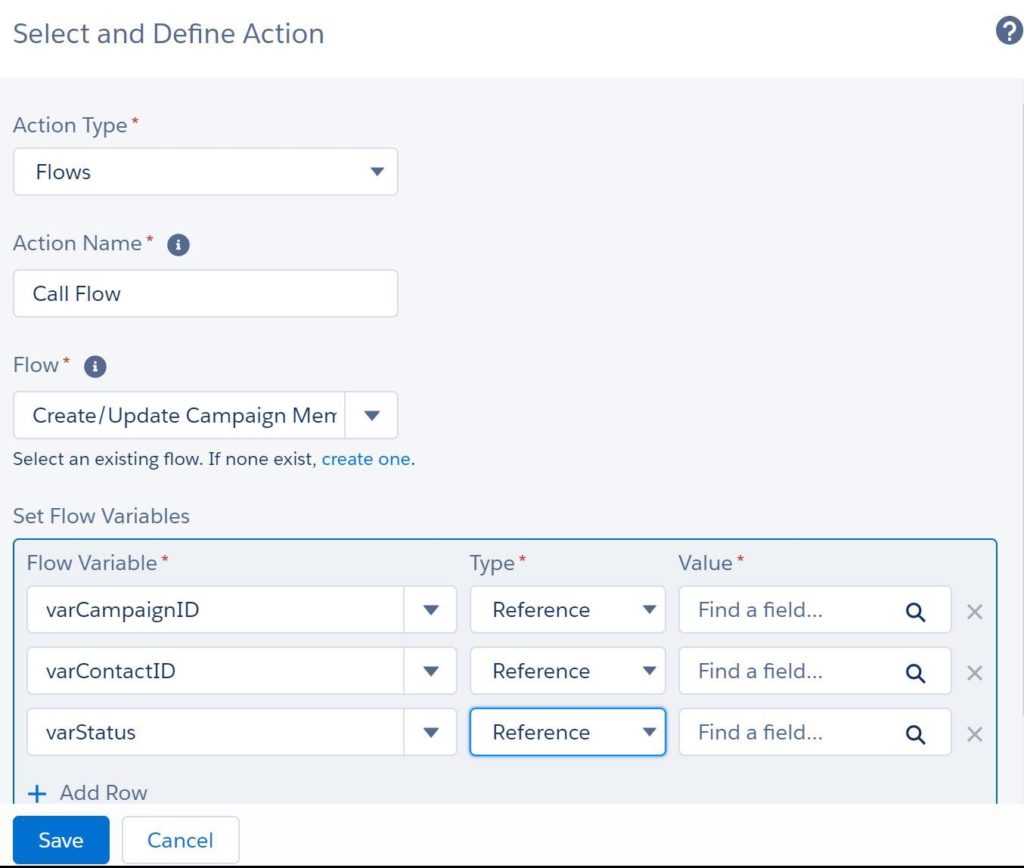
We have our Flow, now we need to create a Process Builder to call the Flow. Since we created the flow as generic as possible, we can reuse it in all sorts of Process Builders. For instance, a Process Builder on the Opportunity and a Process Builder on a Contact can both use this Flow.
Either Create a new Process Builder or edit an existing – add an Action to call our Flow. Set your Flow variables using fields from the record that is going to fire the Process Builder. This is where you can hard code static values for Status or Campaign or any other fields you want to add to your Campaign Member record.
Save and activate your Process Builder (don’t forget to test!).
Deleting a Campaign Member is similar, but instead of having Create and Update Record steps, you add a Delete record step.
Here’s that link again to install the package with these two Flows already created for you. It is an unmanaged package, so once they are in your system, you can edit them to your heart’s content.
Good luck, and let me know if you need any help with any of this!